Beta
Although it is unlikely that people will go to the area to climb what we did, for posterity's sake I thought I would add a page with climbing beta on it, both for the general area and for the peaks that we managed to summit (and not summit). These may or not be useful. I could mis-remember things and my topos may not be 100% accurate. So, if you do go and climb, remember that this is expedition climbing and you are on your own. Use your head, be safe, and have fun.
Getting to Quattrin-Scud Col
You'll want to fly into Yehiniko Lake. The other option is to jet boat down from Telegraph Creek along the Stikine and then bushwhack up a hunters trail to the lake. This will be more expensive and take more time than just flying with Doug and North Pacific Seaplanes. You can contact Doug via email at nps.tatogga@xplornet.com. Doug will know where to drop you, but if you fly with someone else or come in from the Stikine, you'll need to make your way over to the start of the Quattrin Valley. From the air, this is easy to spot as there is a large, though slowly fading, airstrip at the mouth of the Quattrin Creek. There are a few decaying remnants of a dock and some old aviation fuel barrels to mark the spot.
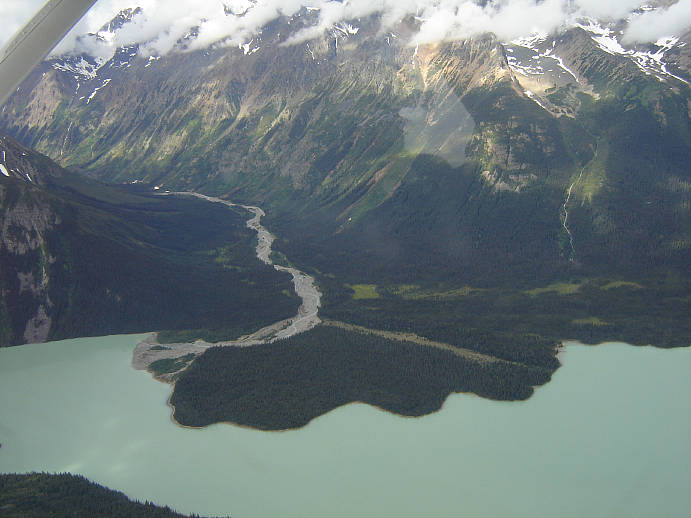
Below is a photo showing Yehiniko Lake. The airstrip and Quattrin Creek are shown on the right. The valley in the dead center is Yehiniko Valley and also runs up to a passage down to the Scud. However, the approach is much brushier.

Below is another aerial view of the airstrip and the mouth of Quattrin Creek.
The approach up Quattrin Creek involves about 70 stream fords, some large, some small. If you come in early, the water level will be much higher and the progress slower. From the mouth of Quattrin Creek to the toe of the Quattrin Glacier is either one very long day (assuming you're carrying heavy loads) or a day and half of pleasant walking. There are a few brushy sections, but these are not very awful.
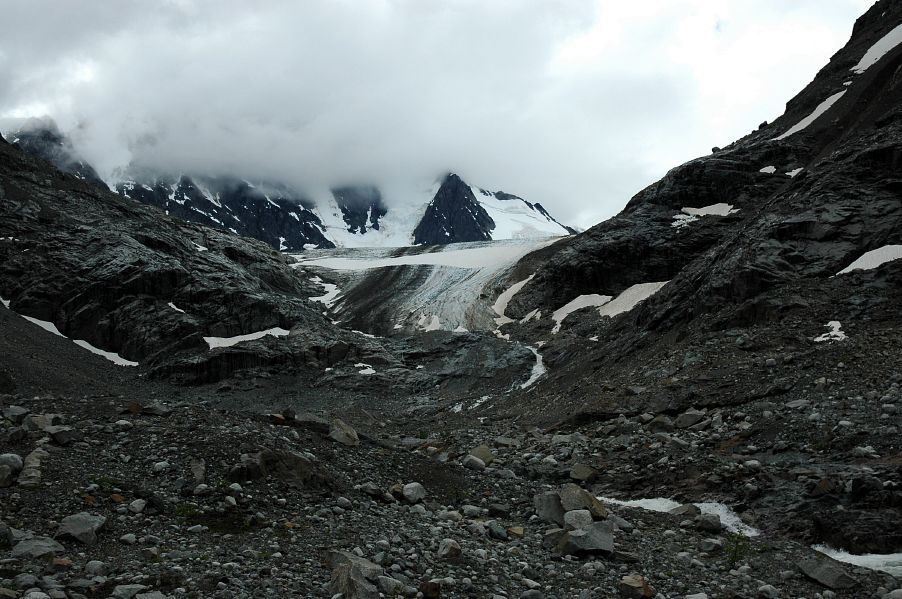
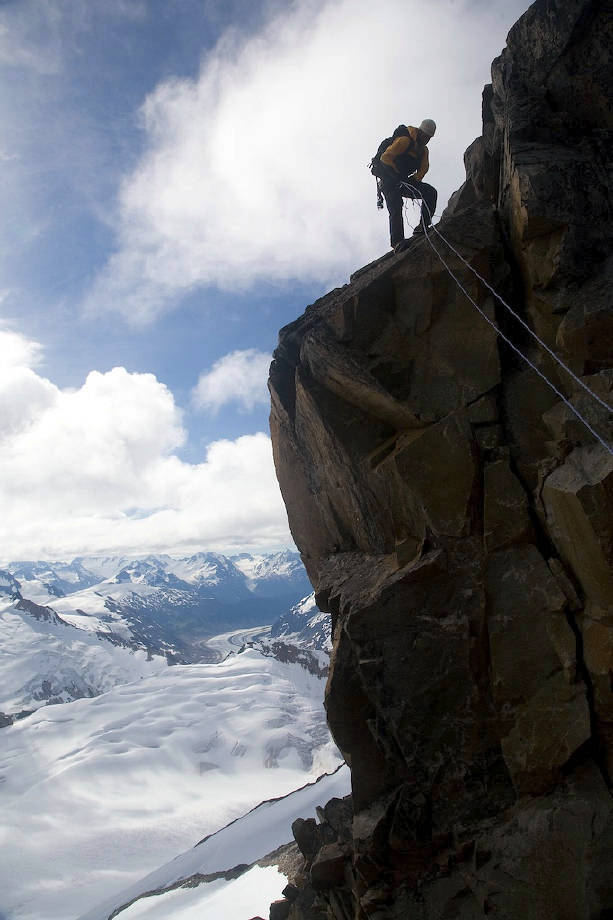
At the toe of the glacier there are a few dry falls to negotiate. These are not too difficult and do not require roped climbing. However, as the glacier recedes, this may change. For now, you can gain the ice fairly easily by scrambling over thin (for me) slabby rock. In the below photo you can see the start of the ice and the dry falls. We basically went straight at the dry falls from where I am, though moved slightly to the right to get around a few obstacles.
The Quattrin Glacier is bare ice for a long way and there are no navigational challenges to be faced. Of course, in other years the glacier might break up different, but for the most part it is relatively flat and the going easy. The ice turns to snow near the end, necessitating a rope. The climb up to the col that separates the Quattrin glacier from the Scud is a moderate snow climb of perhaps 30 degress. We had to navigate around a few bergschrunds and crevasses near the top. You'll need to scramble up some rock. There are few places suitable for camping on the Quattrin side of the col, but if you go to the top, you'll find a host of excellent camping places on the Scud side. In the below photo you can see our approximate route on the glacier with several land marks pointed out.
The West Ridge of White Rabbit
The west ridge of White Rabbit is long and has much loose rock. Most of the climbing is exposed class 4 scrambling on some of the worst rock I've been on. There are shorter segments of low class 5 climbing and we roped for only a single pitch of this. There were few places where the rock was sound enough to either to build an anchor or to accept solid protection. The route, up to where we ended, maxed out in difficulty at about 5.4 or 5.5.
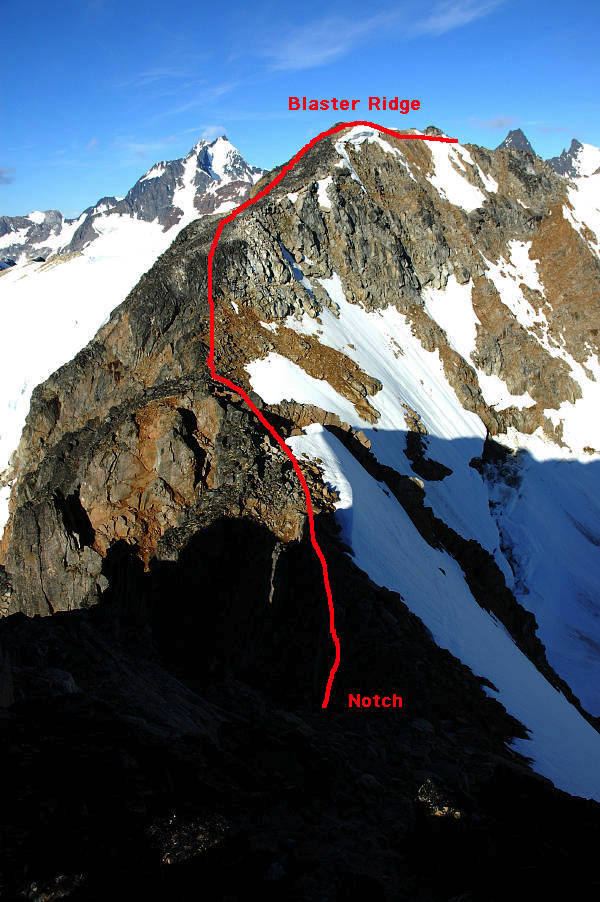
In the below photo you can see the approach route. From the col, climb up the rock to the east to the start of the glacier. Either take to the snow or continue on rock up the moderate slopes to the top of Blaster Ridge. This takes about two hours of work, but there is nothing technical to worry about. The west ridge is the obvious rocky route on the right skyline of White Rabbit in the below photo.

From the top of Blaster Ridge, you'll need to descent several hundred feet along generally acceptable rock to reach a notch at the base of the west ridge. The descent is shown here and is generally class 3, with some exposed class 4 downclimbing. The notch is hidden in shadows in the below photo.
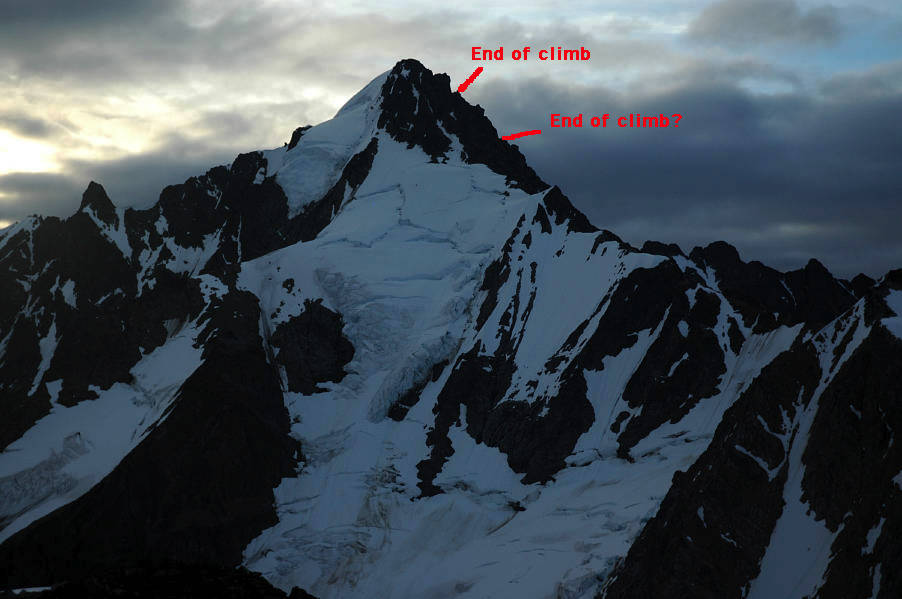
From the notch, the character of the rock changes from acceptable to an utter nightmare. Mike would disagree with this and found the rock acceptable. Generally stay on the ridge, though there are a few times when you need to dodge around obstacles on the left. You have to go up and over a sequence of gendarmes. We stopped climbing in a white out with little visibility, on top of a large gendarme (about 5.5 to get up it). On the other side we saw a steep, tall face, which I believe is visible as the last major obstacle before the summit. Mike and Bob believe that we reached a lower down one. In the below photo, you can see our route, though I have not drawn it in in order to preserve information that would otherwise be obscured with a red pen. The highest marked spot is where I believe we stopped, whereas the lower one is approximately where Mike and Bob think we stopped.
We downclimbed for a little while and then pounded two knifeblade pitons into the only stable looking rock we could find. We built an anchor with this and red webbing. This allowed us to rappel past a particularly tricky section, though it took some time to build. More downclimbing on the ridge led to prominent tower which we lassoed with more red webbing and then rappelled down another tricky section. We downclimbed the rest of the way and returned via Blaster Ridge to camp.
The East Ridge of Doormouse
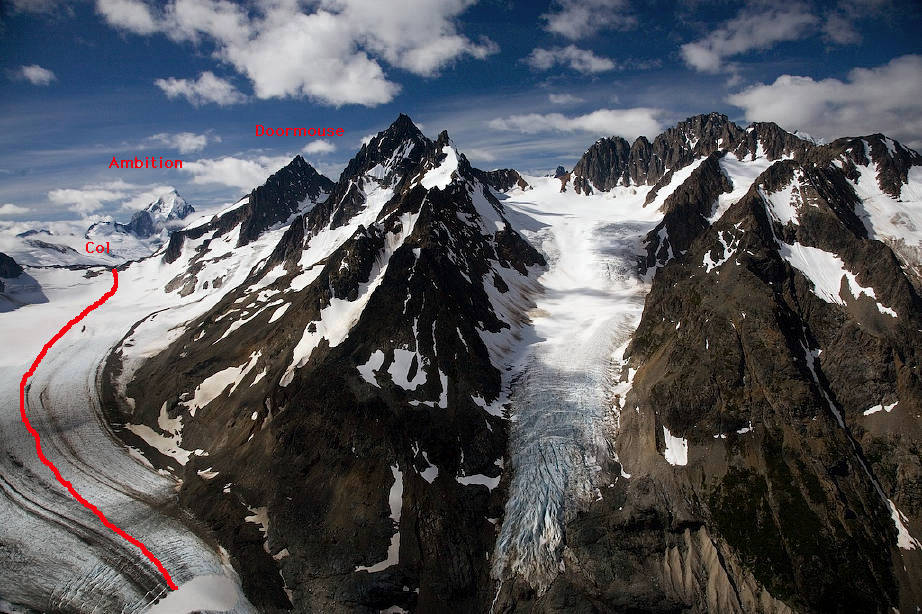
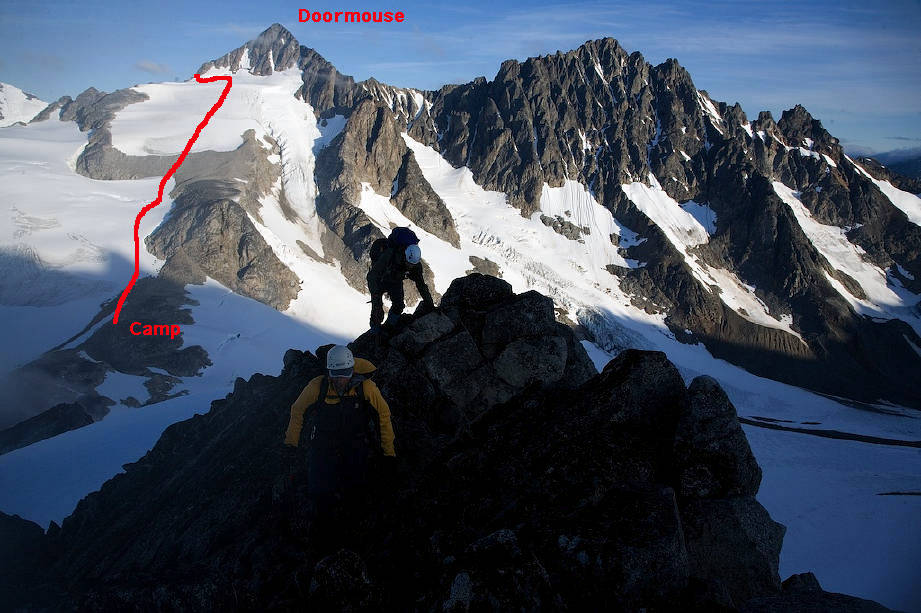
The Doormouse is a bastardized version of Dormouse, a character from Alice in Wonderland. The name was given to the peak for two reasons. First, it sits opposite from White Rabbit, another character from Alice in Wonderland. Second, it sits as a sentinel of the Scud glacier, though from the col it looks small. In the below photo you can see where the Doormouse is in relation to the col. We believe that we have made the first ascent of it. White Rabbit is out of sight on the left.
The route up involves moderate snow and glacier climbing up to 40 or 45 degrees with few difficulties from crevasses, and several good roped pitches of climbing. The rock is generally acceptable. In the below photo, you can see the general route. From the col, cross to the west along the rock until you feel like taking to snow.
Climb the glacier, which grows steeper the higher you go. Crevasses are not an issue. Eventually you'll top out onto a whaleback of snow below the east ridge. Move left to the rock where you can access the ridge. Scramble up class 3 and 4 terrain to a gully. Rope up and climb moderate rock to the top of the ridge. There are several gullies to take, all of which will go. We found the climbing to be about 5.4, though some gullies may be easier, some harder. Once atop the ridge, easy class 2-3 walking over large talus leads along the ridge, which narrows considerably. You'll eventually come to a break in the ridge, necessitating a rappel into a notch below. Building a solid anchor was not difficult. The rappel is about 10 meters in length and is slightly overhanging. You will want to leave the rappel rope in place. A pitch of 5.6 climbing gets you to just below the summit and easy class 2 walking over talus gets you there. The roped pitch runs to the right of the rappel line in the below photo. Protection was generally good, though there was some loose rock and a few run out sections. We built a cairn on top.
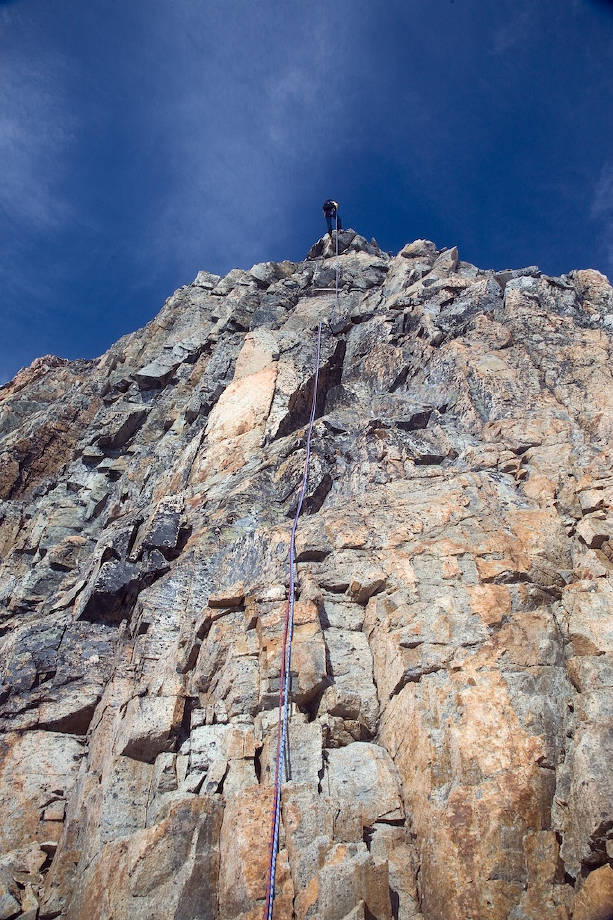
To descend, we slung a large block with blue webbing and rappelled back into the notch. Once in the notch, the easiest way to go seemed to us to climb up the other side. We had left our rappel rope in place and so could climb it on top rope. Note that we had three strands of 8mm rope. One 60 meters in length, one 40 and one 20. The 20 was left on the rappel. The climb up was a strenuous, slightly overhanging off width crack and protecting it would have been difficult. The crack lower down is fist sized but widens considerably a bit out of sight of this photo. We put the rating at about 5.9 or 5.9+. In the below photo I am getting ready to rappel down into the notch. I ended up climbing the face to the right to gain the off width portion, and then grunted and groveled to get up the off width section. Mike and Bob had fewer difficulties.
Retrace the ridge route as far as you can go. We slung a boulder with blue webbing and rappelled as far down as our rope system would allow (40m). This left a little loose downclimbing to reach the snow. To descend, we took a different route that avoided the steeper sections of the glacier.
The South Face of Dokdaon
Dokdaon is one of the three named peaks on the west side of the Scud glacier, the other two being Ambition and Endeavour. Dokdaon had been climbed once before in 1967 via the south face. The route involves some steep glacier climbing and much class 3 scrambling. The route we took up the mountain was not optimal, though we could not possibly know this at the time. There is no technical climbing, but there are a few exposed class 4 sections and poor route finding can lead to low fifth class work. I know this from experience. The best approach is from the Scud glacier, rather than from the col, though the hike from the col to the base of Dokdaon takes only about 1.5 hours each way.
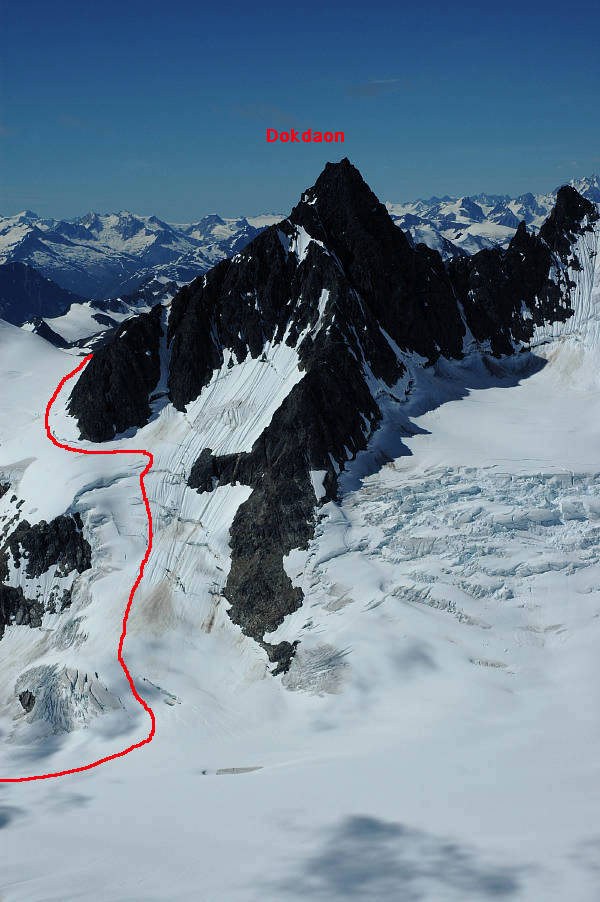
From the Scud, ascend a gentle snow ramp avoiding a few smaller crevasses. The grade of the slope increases from 20 degrees toward forty degrees, though the snow makes for excellent footing. There are larger crevasses and a bergschrund above that must be navigated. We found several snow bridges to get across these. We stayed close to the rock and worked around the side of the mountain as shown above.
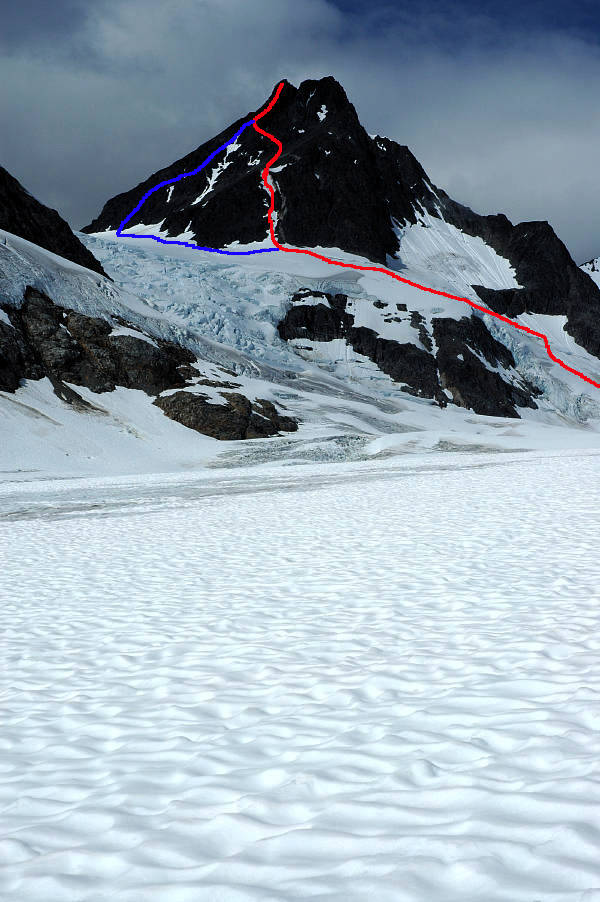
In the below photo the approximate climbing route is shown in red and the approximate descent route in blue. The descent route would be the preferred ascent route. On our ascent we climbed the snow finger shown until it ran into scree and talus. The ascent on the scree was predictably loose, but manageable. In reasonable weather the climb would be a good one and route finding should not be a problem. Several snow fingers were encountered higher up and I would recommend taking them over the rock route that we took. I took one of them on the descent and found the going much easier. Again, Mike and Bob might disagree. We found a rock cairn on top and an empty can that once held some sort of fish from Norway. These were presumably left by the first ascent party in 1967.
To descend, drop directly down from the summit toward the col between Dokdaon and a prominent, snowy peak that we called The Nipple. The descent, after the initial downclimb from the summit, involves easy class 2 walking down screen and rubble to get to the glacier. From the glacier, return around the mountain and descent the approach route.